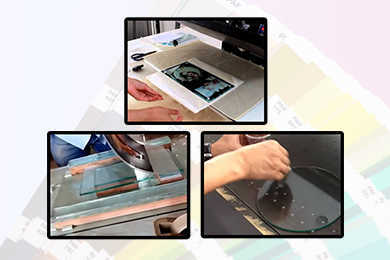
From a drinking glass with a decal to that labeled bottle of wine, you probably have many glass items around your home that were printed. Perhaps you’ve stopped and wondered how it’s done, as you’d like to attempt a similar job yourself. Can you print on glass, and if so, how?
Yes, it’s possible to print on glass, but you need a glass printer to do so. Then you can print flat items like glass coasters or panels as well as cylindrical objects such as drinking glasses or bottles. Before you begin printing, you must prep the glass with a primer or precoat so the print sticks to the surface.
If you’re curious to learn even more about how the glass printing process works, this is the article for you. In it, we’ll delve into the steps to follow to print on glass. We’ll also discuss some other options you may consider if you can’t get your hands on a glass printer.
Let’s begin!
Can You Print Photos on Glass?
If you’ve only worked with standard inkjet or laser printers, then to you, it might seem impossible to print on glass. You can’t fit a glass item in your printer, and even if you could, wouldn’t it shatter instantly?
It sure would. That doesn’t mean printing photos on glass is impossible, though. Here’s a video example doing just that courtesy of YouTube. You only need a specialized glass printer to begin:
This is one such printer from Direct Color Systems. Their Direct Jet UV LED inkjet printer allows you to design your own text, logos, and photographed images and then print them onto a glass surface. From coasters to drinking glasses, bottles, glass signs, and everything in between, you can create professional-looking printed glass items for your own personal use or resale.
The VersaUV LEF flatbed printer from Roland is another good option. This glass printer is intended for printing on glass food containers, fragrance bottles, beer and wine bottles, and other glassware. With clear ink texture effects for higher-quality projects, this printer gives you more bang for your buck.
Here’s a long video about printing on glass cylindrical objects from Roland that’s very much worth watching:
How Do You Print Photos on Glass? 7 Steps to Follow
If you intend on printing a photo on a glass item only once, then you might want to let a professional print-on-demand team handle it. That said, if you’d like to sell glass items on your Etsy shop or elsewhere online, it’s worth investing in a glass printer.
Once you buy your printer and it arrives, how do you get the glass printing process started? Here are the steps to follow.
Step 1: Choose Your Glass Item
First thing’s first, you have to pick the glass item you’d like to print on. As we discussed in the last section, you have a wide array of objects at your disposal. These include glass coasters, panels, bottles, jars, food containers, and more.
In knowing the size and shape of the glass item you’ll work with, the next step becomes much easier.
Step 2: Select Your Photo
That step is picking out the photo you’d like to print. Don’t worry so much about the size right now, as you can and will adjust that later.
Depending on the glass printer you have, it’s important to keep an eye on the color composition of the photo. For instance, the VersaUV LEF flatbed printers from Roland, specifically the LEF3-200 and LEF-300 models, are designed to print full-color graphics. Other glass printers may be as well.
If your glass printer by chance cannot print a full range of colors, then choose a simpler photo or even one that’s in black and white.
Step 3: Size the Photo to Your Glass Item
We said you’d probably have to resize your photo, so that’s what you want to do now. Use your favorite photo editing software or tools to shrink down the photo so it’s within the parameters of your glass item.
Make sure you’re not stretching, pinching, or otherwise distorting the photo too much. It will then be of a lower quality, which may be noticeable when you print. Also, keep in mind that a wraparound photo such as one printed on a glass bottle may have to be a bit longer than it is taller depending on the look or style you’re going for.
If you want to see some glass printing on a truly large scale, click here for this video on YouTube. While you probably won’t print a glass item nearly as huge, it’s still cool to see what can be done using industrial-sized printers.
Step 4: Add a Primer or Precoat
How can you ensure your printed design will adhere to the glass and not just slide right off? You need to prep the glass first. To do this, you can use primer ink or a precoat depending on your glass printer model. The Roland glass printers we talked about above include primer ink so you hardly have to think twice about prepping your glass.
Here’s a YouTube video showing glass precoat being mixed and applied:
You’d then use a paintbrush to coat the glass surface that you plan on printing. Make sure you cover the glass evenly throughout or else the photo might not print on all parts of the object.
Step 5: Load the Glass Item into the Printer
You’re about ready to get started now. Next, you want to fit the glass item into your printer so it’s secure. If your printer requires you to orient the item so it’s facing the right direction (such as face-side up) for printing, then don’t forget to do this. You wouldn’t want to print on the wrong side, after all.
Step 6: Print
Power on your glass printer, send the image to the printer, and you’re all done. You can usually watch the printing as it happens so you’re certain the process is going as intended.
Step 7: Admire the Results
When your glass printer finishes, voila! You should have a one-of-a-kind printed glass item with your favorite photo transferred directly on.
Are There Other Methods for Attaching a Photo to Glass?
If for some reason you cannot use a glass printer nor can you find a print on demand service, you’re not totally out of options. You can still attach your printed photo onto a glass item using other methods. As a word of caution, these won’t look as good as printing the photo directly onto glass, and the results may not last as long either.
Using Mod Podge
The first method relies on an adhesive like Mod Podge. First, you want to select your glass item, then your photo. Next, you want to resize the photo as you did before.
Print the photo using a standard inkjet or laser printer. Then, take your Mod Podge or your gel transfer adhesive of choice. With a craft brush, coat the adhesive to your glass, but only where the photo will go.
After that, push your printed photo onto the glass, applying firm pressure. Once the image is mostly stuck on, a squeegee can push the air bubbles up and out. Then it’s just a matter of waiting, sometimes upwards of 24 hours for the image to fully dry.
Printing, Soaking, Then Adhering
The next method takes a little longer but still brings you to the same results. Start as you did before, picking first your glass item and then your photo. Print it using a standard laser or inkjet printer, double-checking that it’s sized to your glass item.
Next, take some packing tape and cover the entirety of the picture. Using a squeegee or a credit card, remove all air bubbles. Then, cut any white surfaces that are not the image from the printed piece of paper.
When you’re done, fill a bowl or basin with warm water. Take your printed, taped image and dunk it in the bowl, leaving it there for at least five minutes. When you take it out, begin rubbing at it until all the paper comes off the tape. This may take a few soaks to finish, but you only want to keep the paper in the water for two minutes at a time after that first instance.
Dry the packing tape with a hairdryer until the backside is sticky. You can then tape the printed image onto your glass item.
Check out this video on YouTube to check out the process in action, although this person doesn’t soak their paper:
Conclusion
To successfully print a photo onto a glass surface, you need a glass printer. The image should be sized to your glass item, then prepped with either a coating or primer. When you print, the results will astound you.
Now that you know how to print on glass, you can make homemade, personalized gifts for friends and family they’ll love. You can also start selling amazing glass items online that will surely earn you a big following!


